
Sekonic Camera Profiling
If you are lucky enough to have the Sekonic L-758Cine light meter, there are plenty of tutorials out there on how to use their DTS software to profile your camera. This is just a quick tip on how I went about it, and some things to be aware of. In particular I am focussing on how to calibrate the Sekonic light meter for use with a video camera which you have no idea what the ISO is, and how to adjust for your camera’s picture profiles.
I have two main cameras, the Canon XLH1 and the Canon 7D DSLR. Now although the Canon XLH1 is getting a bit long in the tooth, there is still life left in it, particularly for HD, but in order to get the absolute best from this camera, the scene that is being shot must fall, lighting wise, within the now small dynamic range, of this camera. Typically, the dynamic range of the XLH1 is around 6 stops. Using a flat picture profile in the camera, this can be squeezed up to around 7.5 stops. Half the range available in some modern cameras, but still a range that can be worked with. The key is to knowing what range is presented in the scene and to adjust lighting to be within range and still achieve the required contrast ratios.
The first hurdle using the light meter is what to set the ISO to ? The XLH1, and many other Video cameras, don’t have ISO as a measurement. They may have a gain control that goes up in steps of 3dB, but that doesn’t relate to ISO. The first thing we need to do is match the light meter to the camera and set the ISO. I’ve seen many tutorials / tips that suggest going outside and doing this, but, although our eyes are very forgiving, light levels change outside, so I would suggest that this is best done under controlled conditions, i.e., inside using a light.
For my setup I used a 650W tungsten lamp.
For example, my reference mid-point was F/8 and 1/60th of a second. For the 16x manual lens I was working with, I could only reduce the Aperture to F/16 (2 stops), so the 3rd stop I used the shutter set at 1/120 (actually 1/125 on the XLH1, but made a note!)
One extra point to note is that during the calibration, I set the sekonic to use FULL stops of light and 1/60th shutter speed. As I live in PAL land and my camera aperture is graded in third stops, I changed the sekonic to go in thirds and changed my cameras shutter speed to be 1/50th.
The power of what we have done means that the light meter has been calibrated, and also matches the camera setup. This also means that I can see what is within the cameras dynamic range as the Sekonic shows low and high clip points.
I can increase the dynamic range of my camera by using a flat picture profile, but how do I now use this with the sekonic? Not as difficult s it may seem, but has a small gotcha if you’re not careful. I setup my camera as before, and selected the flat picture profile. The aperture still set to F/8 and shutter speed set to 1/60th (note I also set the Sekonic back to full stop operation). The first part is to set the sekonic camera profile to the DEFAULT CAMERA SETTINGS. Rinse and repeat the process above for setting the initial ISO, taking the +3EV 0EV and -3EV shots, and creating a sekonic profile. You should notice you have a larger dynamic range because of using the flat picture profile. Now the gotcha. Just because you measure the ISO the first time we did this (i.e. with no camera picture profile) doesn’t mean you can skip this step. The flat profile alters the preset loaded in the sekonic because that is also based on the actual visual image used in the calibration. So, set to F/8 1/60th , take a meter reading and adjust the ISO accordingly.
Now when you use the sekonic, it will give you readings that it knows your in camera picture profile is able to capture. In my case I now now how dark and how bright I can go to when using the flat profile. This is really useful as flat profiles look horrible on screen until graded!
I’ve brain dumped this very quickly, so may come back and update / make it neater, but thought it was worth sharing as is.
For my own setup, I have done this process for 2 lenses (16x manual and 20x stock lens), and across three profile setups: No profile, CP 5 (One I have tuned to look spot on out of the camera), CP6 (Flat profile giving 2 stops adidtional dynamic range).
The ISO settings for all these ended up different.
The first hurdle using the light meter is what to set the ISO to ? The XLH1, and many other Video cameras, don’t have ISO as a measurement. They may have a gain control that goes up in steps of 3dB, but that doesn’t relate to ISO. The first thing we need to do is match the light meter to the camera and set the ISO. I’ve seen many tutorials / tips that suggest going outside and doing this, but, although our eyes are very forgiving, light levels change outside, so I would suggest that this is best done under controlled conditions, i.e., inside using a light.
For my setup I used a 650W tungsten lamp.
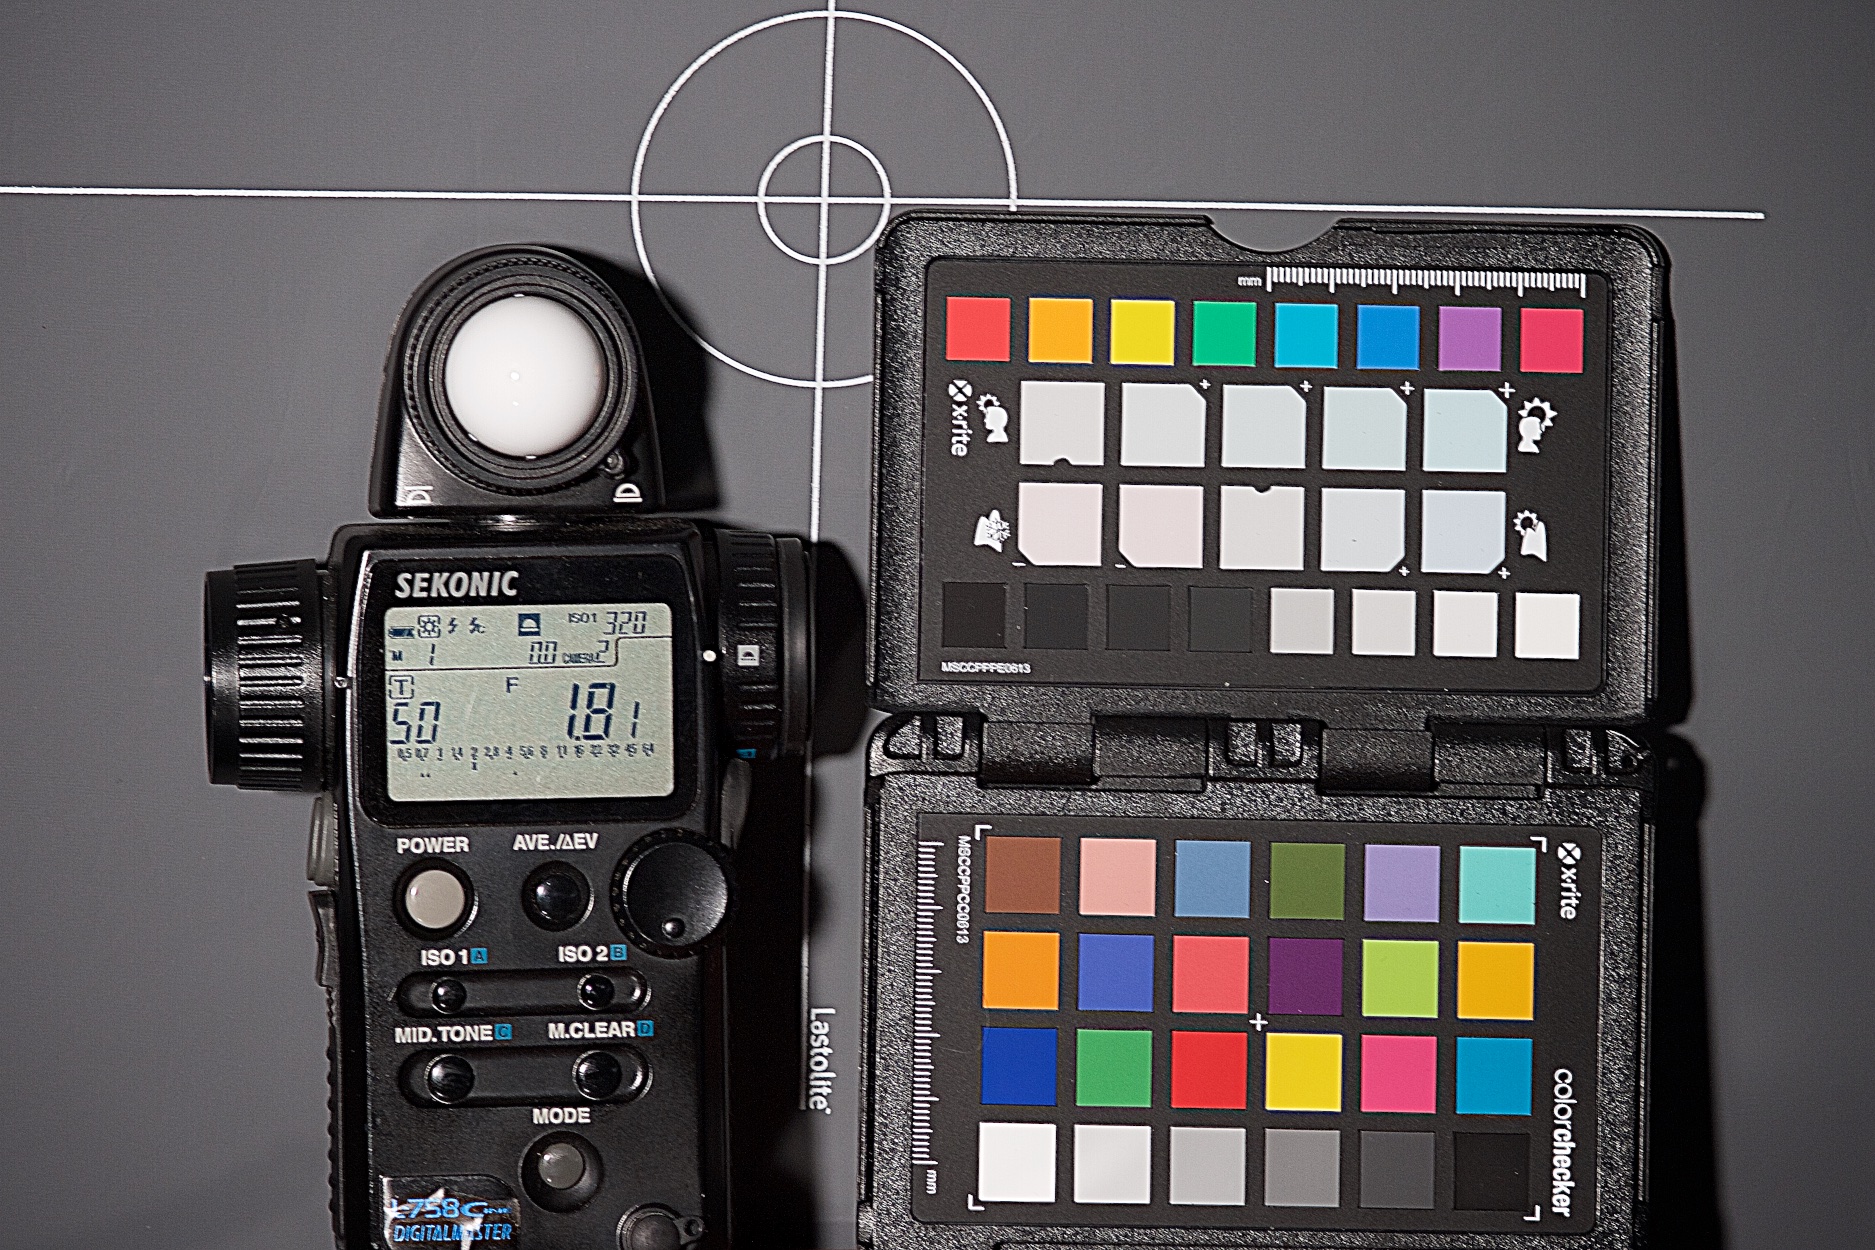
- Place a calibrated grey card about 2 metres away from your camera. I use a lastolite flip out one.
- Place your lamp about a metre away, for now, and turn on the camera. Now this is what your’re not told. It’s much better to work in Full stops of light on your lightmeter, and just match the shutter speed of your camera, to a full stop shutter speed, such as 60fps. For the XLH1 & the 650W lamp in the setup I describe here, F8 on the XLH1 is about where the exposure should be. Zoom in to make the grey on the grey card fill the screen. If you can;t exactly get the camera exposure to be a full stop setting, such as F8, then gently move the lamp either nearer or further away until the camera on board exposure meter reads F8.
- Now you have your camera reading F8, shutter speed as 1/60 as middle grey (also make sure you have no electronic gain set). Connect your lightmeter to your computer via usb, power it up, and start the DTS software. When loaded, click the top setting, CAMERA DEFAULT, and load it into slot 1 (camera1) and transfer to your lightmeter. This ensures a default starting base.
- Use the light meter in incident mode to take a reading at the grey card. This is likely to not match your F8 camera reading. Adjust the ISO on the lightmeter until it does. This is the ISO of your current camera setup. When I say current, this “ISO” can change between lenses and and built in camera profiles you use on your camera. For this first run through, lets assume we have no camera profile loaded into the camera and we are on full manual settings.
- Note down the exact lightmeter reading. For me, this was F8.0 and 1/10th
- Take a reflective reading of the same spot, for me this F8.0 and 2/10ths. Make a note of the ISO, the frame rate, the incident & reflective readings.
- Reframe your camera on the xrite colour checker passport so that the colour patch side fills the frame, then take a few seconds at the current settings which marks the mid-point of exposure.
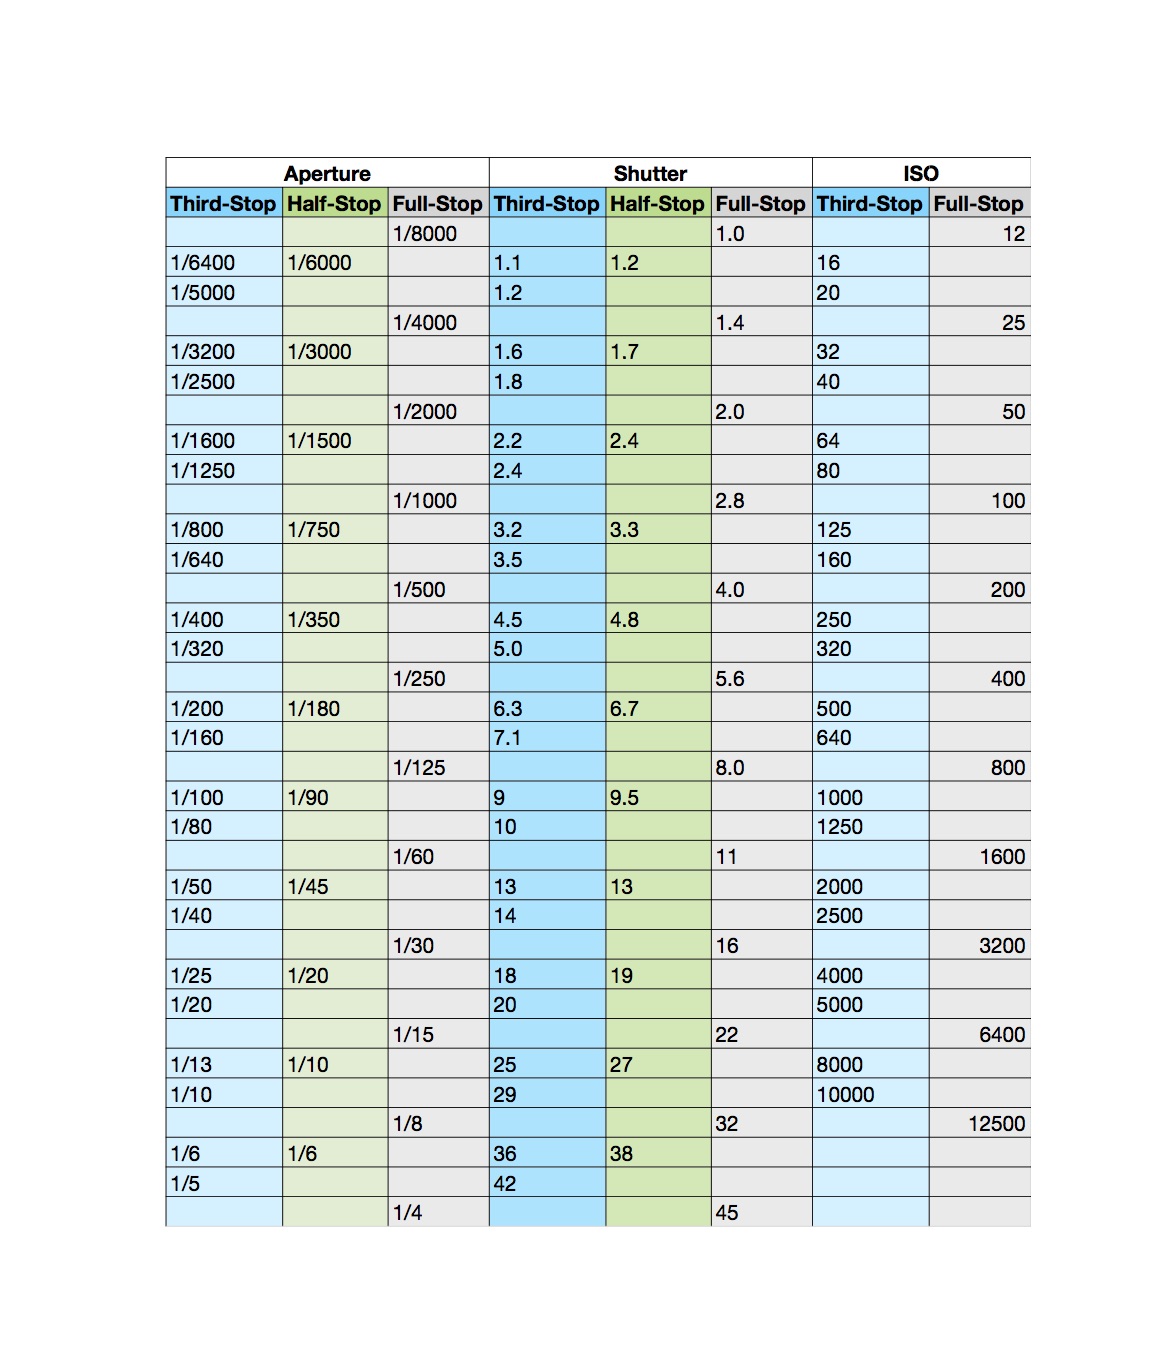
- Set your exposure 3 stops below current. Depending on the range your camera lens has, this can be achieved by changing either the aperture, shutter speed or both. The table below shows the exposure values for each parameter in your camera, Aperture, Shutter and ISO. As a preference, try and adjust using the aperture first in whole steps and only if you can’t achieve this, use shutter speed.
For example, my reference mid-point was F/8 and 1/60th of a second. For the 16x manual lens I was working with, I could only reduce the Aperture to F/16 (2 stops), so the 3rd stop I used the shutter set at 1/120 (actually 1/125 on the XLH1, but made a note!)
- Now set your exposure to three stops over your mid-point. For my camera, that meant F/2.8 and shutter speed of 1/60. Take a few seconds video.
- Take your footage, load it into video application and extract off three still shots, saved at 8-bit uncompressed TIFF or JPG files
- Load the Sekonic DTS software and use the three images gathered to build your profile. Set the EXIF data as necessary by using the values you noted down as you shot.
- Now save your profile, and load it into one of the spare camera profile preset slots on your lightmeter
- Go back to the camera, check its setup for F8 1/60th as before, and reframe it to point towards the grey card (fill the frame with grey). Take a reading with the Sekconic using the saved camera profile. If you find that the Aperture is wildly different, then adjust the ISO for this preset. This will be the ISO for this setup. You could try verifying what you have done but moving the lamp back and creating a darker scene and adjusting the camera to get mid exposure, then take a reading using the Sekonic. The readings should be pretty close.
One extra point to note is that during the calibration, I set the sekonic to use FULL stops of light and 1/60th shutter speed. As I live in PAL land and my camera aperture is graded in third stops, I changed the sekonic to go in thirds and changed my cameras shutter speed to be 1/50th.
The power of what we have done means that the light meter has been calibrated, and also matches the camera setup. This also means that I can see what is within the cameras dynamic range as the Sekonic shows low and high clip points.
I can increase the dynamic range of my camera by using a flat picture profile, but how do I now use this with the sekonic? Not as difficult s it may seem, but has a small gotcha if you’re not careful. I setup my camera as before, and selected the flat picture profile. The aperture still set to F/8 and shutter speed set to 1/60th (note I also set the Sekonic back to full stop operation). The first part is to set the sekonic camera profile to the DEFAULT CAMERA SETTINGS. Rinse and repeat the process above for setting the initial ISO, taking the +3EV 0EV and -3EV shots, and creating a sekonic profile. You should notice you have a larger dynamic range because of using the flat picture profile. Now the gotcha. Just because you measure the ISO the first time we did this (i.e. with no camera picture profile) doesn’t mean you can skip this step. The flat profile alters the preset loaded in the sekonic because that is also based on the actual visual image used in the calibration. So, set to F/8 1/60th , take a meter reading and adjust the ISO accordingly.
Now when you use the sekonic, it will give you readings that it knows your in camera picture profile is able to capture. In my case I now now how dark and how bright I can go to when using the flat profile. This is really useful as flat profiles look horrible on screen until graded!
I’ve brain dumped this very quickly, so may come back and update / make it neater, but thought it was worth sharing as is.
For my own setup, I have done this process for 2 lenses (16x manual and 20x stock lens), and across three profile setups: No profile, CP 5 (One I have tuned to look spot on out of the camera), CP6 (Flat profile giving 2 stops adidtional dynamic range).
The ISO settings for all these ended up different.
blog comments powered by Disqus