
Using Mocha Shapes to mask / replace an object
Mocha shapes can be used to mask objects in a clip. They can also be used to replace objects but the replacement object must be setup correctly, the same size and alignment as the mocha shape. This short tutorial shows two different ways that object replacement can be achieved using Mocha shapes and After Effects.
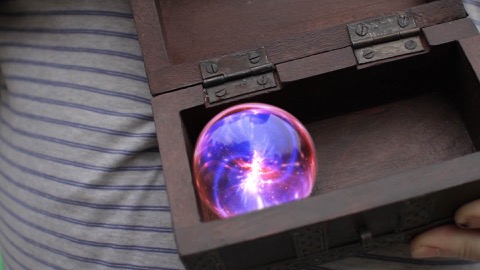
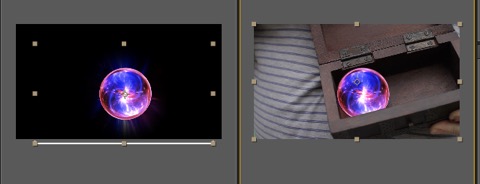
The goal of this shot was to have a box opened that revealed a self contained mystical ball or orb (courtesy of one my favourite sites, Video Copilot ). The live footage had a glass ball inside the box which was placed there not only for reference but also to provide some real reflections. The shot is not stabalised and the box / glass ball change perspective, only slightly. The glass ball needs the Orb composited over so as to give the illusion that it’s in the box.
Method 1 - Using Mocha Shape Plugin For After effects
Using the Mocha Shape plugin means you can utilise the shape feathering from mocha which is controlled per spline and keyframed.
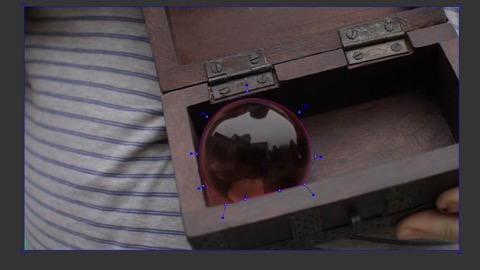
1. Create your track & shape data within Mocha. I chose to create a spherical shape for the glass ball. Choose the most appropriate frame that you want to place your new object on, and click ‘Align Surface’ in Mocha. It’s always a good idea to duplicate your tracking layer first just in case you need to revert anything. The picture below shows the shape spline that I will be using and with the surface toggled on you can see this has been aligned with the entire frame.
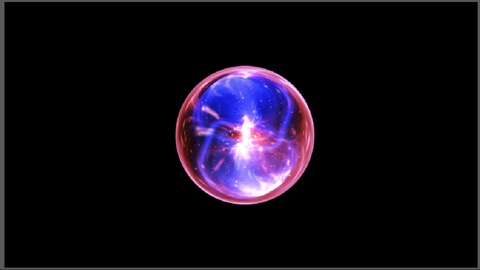
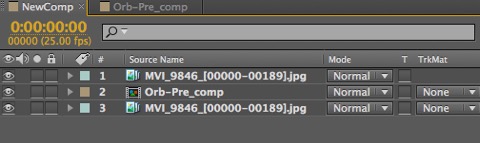
2. In After Effects, create your composition with the original footage and the layer containing your replacement item. For this example, I want to replace the glass ball in the box with an animated Orb. The replacement composition must be the same dimensions as the original footage so the ‘Orb’ layer has to be place in a Pre-Comp.
3. In Mocha, select ‘Export Shape Data’, then choose ‘copy to clip board’
4. Go back into After Effects, select the top footage layer (whilst ensuring that the timeline is at the beginning) and press paste. This will paste in the Mocha shape data using the mocha shape plugin.
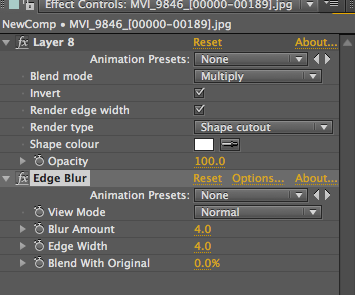
5. Go to the Effects Control and either click invert, or change the mode from multiply to subtract. This now has the effect of cutting a hole in the footage. Depending on the blend (and whether feathering was used in mocha), you can apply that with ‘Render edge Width’. An alternative is to put an edge blur on the layer.
6. Go back into Mocha and select ‘Export Tracking Data’ and take the corner pin option.
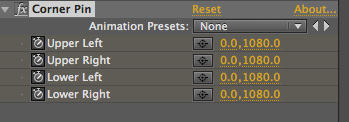
7. In After Effects, Select the Pre-Comp containing the replacement layer and paste the data in. This now corner pins that layer.
8. Now go to the same frame that was used in Mocha for the Align Surface operation, and with two viewers open, one locked on the composition and the other on the replacement layer, make the replacement object fit properly in the comp so it fits perfectly.
And that should just about do it! This depends on how good the tracking data is, but the results should match the tracked object in Mocha.
Method 2 - Import Mocha Shape as a mask
This same effect can achieved by using after effects masks instead of the Mocha Shape Plugin. This has the advantage of being able to track and export masks easily from Mocha but you will lose any feathering that has been done in Mocha (this probably isn’t much of an issue). You do however have access to the normal features of After Effects masks such as feathering, expansion etc etc.
1. Follow Steps 1-3 in Method 1 above.
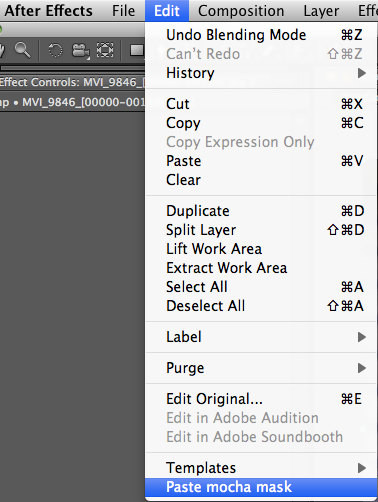
2. In After Effects, select the Top footage layer, then from the Menu, select Edit->Paste mocha mask (again ensuring that the timeline starts at the beginning).
This would have pasted a mask into the footage layer. Ensure that its mode is set to subtract, and alter the feathering to suit.

3. Go to Mocha and select export tracking data -> copy to clipboard. (if you want to use the Red Giant Warp tool you will need to save the tracking data to a file).
4. Go to the replacement layer and paste the data. This will create a corner pin. In the example below I have used the RedGiant Warp tool as for my comp there are some errors which can be corrected easily with the RedGiant tool.
5. Now go to the same frame that was used in Mocha for the Align Surface operation, and with two viewers open, one locked on the composition and the other on the replacement layer, make the replacement object fit properly in the comp so it fits perfectly.
blog comments powered by Disqus