
Fixing Dead Pixels With ffmpeg
Electronic cameras will at some point in their lifetime exhibit dead, or hot, pixels. These take form by a single pixel, or small cluster of pixels, remaining on all the time. Sometimes red, sometimes white, but in every case, but always there. It’s not always easy to spot them, depends on where they are and the colour of the underlying action. You may not even notice them if you are following the on screen action, but as soon as you do, it becomes very distracting and undesirable. Getting rid of these, in most cases, is much easier than you may think. This article describes what I would argue is the simplest way of doing this, particularly as it can be incorporated into the DIT phase of a project.
As a user of Premiere Pro and After Effects, there are ways that dead pixels can be removed, but it’s not exactly easy or in a workflow friendly manner. In Premiere, a technique discussed much, is making a black and white mask of where the dead pixels are, importing that into Premiere on a layer, duplicating your footage, blurring one layer and using the mask to allow the blurred areas through (in the latest premiere, I believe the masking can be done directly in premiere as a property of the gaussian blur). This technique works ok for some situations, but video with large contrast in colours and particularly moving footage, it doesn’t always cover up the problem, and results can vary.
A more successful technique is to use the CC Simple Wire Removal tool in After effects and position the two points either side of the offending pixels and adjusting the thickness, slope, and mirror blend parameters. This does seem to do an excellent job and was the way I ‘used’ to tackle this issue, but After effects rendering is serial in nature and doesn’t appear to fully utilise the horse power your computer has to offer. For example, I had four 1 hour clips to fix. Using either Media Encoder, or a single instance of After Effects, it managed to use 130% of CPU (an odd measurement, my computer can go upwards of 2000%, all to do with cores and hyper threading), or in real terms, it was using about 5-8% of what was available. Even if I fired up four copies of After Effects, each one doing one of the files, that would still only use in total about 500% of CPU, in real terms about 25% of what was available. So this process took around 2.5 hours when running 4 in parallel. However, had I left it to the default way Adobe products would have handled this, it would have taken upwards of 10 hours. Note the source footage is ProRes 422 and rendering out is also to ProRes 422.
There are alternative solutions out there based around plugins. I’ve tried a few on the trial version, and to be honest, the After Effects technique still stacks up. But what if you don’t have Premiere Pro, or After Effects and use a different editing package? That’s where FFMPEG comes into the mix. FFMPEG is probably the single most useful and functional command line video / audio processing tool available, and one that I could not do without for many reasons. In the context of this article though, it can be used with one of its built in filters, delogo, to fix these dead pixels. For me, this tool has the following advantages:
- Threading and ability to start off multiple instances
- Well supported
- Can be scripted and included as part of the DIT phase of a project.
- Very functional tool
- Free!!
So let’s start off with the issue, dead pixels. The screenshot below shows a zoomed in frame in photoshop, of a dead pixel. In a still, this just looks like a grey pixel, but when in motion, this sticks on the screen and is very obvious. This process relies on you knowing the X/Y coordinates of all the dead/hot pixels. Photoshop has the info panel which, if set to display pixel dimensions, will show the coordinates of the cursor. Use this to point to the exact point of the dead pixel and make a note of the X/Y reading. Do this for all the dead pixels you have. If you don’t have photoshop, then most other photo editing packages should have this feature (such as gimp etc, or the best photo editing program ever, Affinity Photo: View -> Studio -> Info).
Now we have the location of this dead pixel, (x=405, y=768), we can construct our command line. As stated earlier, the source in this case is ProRes and so is the destination, but it doesn’t have to be. Here is the command I initialy used:
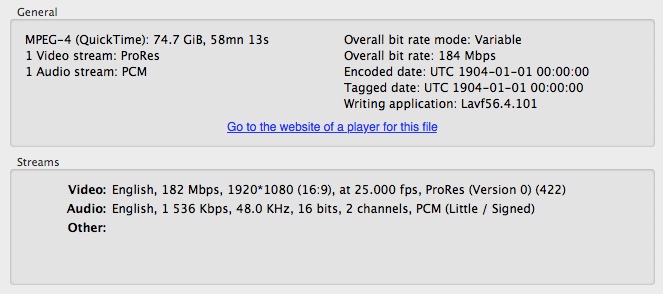
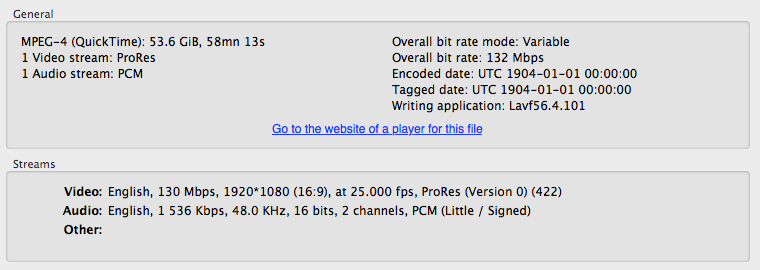
ffmpeg -i ../../RAW/26112015/CAM_A/XLH1_A_S004_S001_T001.MOV -vf "delogo=x=405:y=768:w=2:h=2" -vcodec prores -acodec copy XLH1_A_S004_S001_T001_FFMP.MOVThis absolutely fixed the problem with the dead pixel and rendered an extremely high quality video file, but was larger than the original. Using another great piece of software, media info, the codec details are easily compared.
Original File

Fixed File
Custom Bitrate
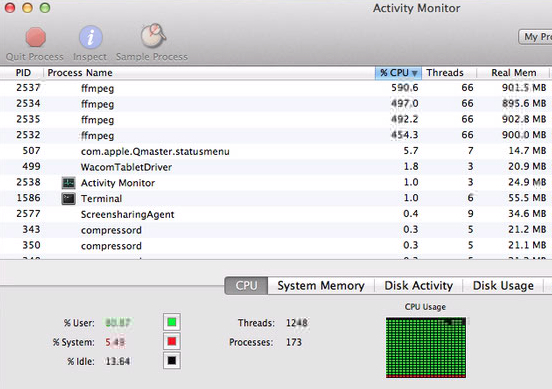
The results are visually indistinguishable from the source, other than the dead pixels being removed! What’s more, the above utilises as much CPU as it can. As I had four 1 hour files to transcode they can be started at the same time, and ffmpeg reports anywhere from 27fps to 35fps as the processing speed of each file (note 4 running simultaneously). This means that it will take approx 1 hour transcode all 4 of the source files.
The following options create a lower file size but with equally high quality, however, the amount of CPU used is less (similar to After Effects), but still has the advantage of being scriptable.
ffmpeg -i ../../RAW/26112015/CAM_A/XLH1_A_S004_S001_T001.MOV -vf "delogo=x=405:y=768:w=2:h=2" -vcodec prores_ks -profile:v 2 -qscale:v 4 -pix_fmt yuv422p10le -vendor ap10 -acodec copy XLH1_A_S004_S001_T001_FFMP.MOVAs far as Dead Pixel removal, the following are then parameters of interest:
-vf "delogo=x=405:y=768:w=2:h=2"One of the cameras I have has three dead pixels. FFMPEG can cope with this by adding further “delogo” parameters.
-vf "delogo=x=530:y=340:w=2:h=2,delogo=x=899:y=482:w=2:h=2,delogo=x=395:y=918:w=2:h=2"the x & y parameters are the coordinates, whereas w & h are the width and height of the cover up effect. I would suggest keeping this small, 1 to 4 pixels.
The ProRes codec being used utilises the following parameters:
-vcodec prores_ks -profile:v 2 -qscale:v 4 -pix_fmt yuv422p10le -vendor ap10There is further documentation about these on the FFMPEG website, but in short, the -profile:v A, controls which type of ProRes file to create, and the -qscale:v B, controls the quality. Both will affect the file size, and end result.
Where B is a whole number between 0 and 30, and A can be one of the following:
0 - ProRes Proxy
1 - ProRes LT
2 - ProRes (standard)
3 - ProRes HQ
4 - ProRes 4444
For ProRes 4444, you will also need to change the pixel format parameter to -pix_fmt yuv444p10le (or if you want to include alpha channel, yuva444p10le)
The dead pixels are a function of the camera sensor and tend to be constant, however, you do need to monitor this. My workflow means that I record from my video cameras straight onto Samurai SSD’s and for the DSLR, onto CF cards. This pixel correction can be done on ingest prior to editing, so the process I follow is:
Camera -> SSD (via Samurai) -> ffmpeg DeadPixel removal phase -> HardDisk -> Duplicate.
Further, I do tend to record 10 seconds with the camera gain turned right up and the lens cap on to expose as many dead pixels as possible. This 10 second clip can then be reviewed prior to the main ingest so dead pixel locations can be checked and new ones noted.
To be absolutely pure however, your should back up your source material as is and create the FFMPEG versions that will be used for the editing process. This does take up more space, but is recommended to ensure you don’t corrupt any of your source material. Once you have reviewed the rendered versions and ensured that everything is in order, then only the rendered versions are required, and at that point you can consider discarding them. This is, however, a personal workflow choice.
blog comments powered by Disqus